- January 7, 2020
- Posted by: Syed Shujaat
- Category: Uncategorized
Installing the Remote Desktop Licensing Role
- On your license server go to Manage -> Add Roles and Features
- Click Next
- Select Role-based or feature-based installation and click Next
- Select the license server from the server pool. Click Next
- Scroll down and select Remote Desktop Services. Click Next
- Click Next without selecting a Feature
- Click Next
- Select the Remote Desktop Licensing role
- Click Add Features on the pop-up
- Click Next
- Select the Restart the destination server automatically if required then click Install
- Once finished click Close.
Activate Licensing Server
- Launch the Remote Desktop Licensing Manager. Go to Start -> Control Panel -> Administrative Tools -> Remote Desktop Services-> Remote Desktop Licensing Manager
- Right-click your server name then click Activate Server
- Click Next
- Leave it on Automatic connection and click Next
- Enter your information and click Next
- Check the box to Start Install Licenses Wizard now then click Next
Install Licenses
- Right-click your server name in the RD Licensing Manager then click Install Licenses
- Pick the type of license you want to install. (Retail Purchase)
- Enter your license then click Add
- Click Finish
Add license server to Activate Directory
- Go to All Server and click Review
- Click the Add to Group (This step will allow your license server to be a member of the terminal server license servers group)
- Click OK
- Configuration should now show green and check that your server is a member of Terminal Server License Servers
GPO for Terminal Licenses User/Machine based deployment.
The settings can be found in the following location, and they are self-explanatory.
Computer Configuration → Policies → Admin Templates → Windows Components → Remote Desktop Services → Remote Desktop Session Host → Licensing
(The configured GPO must be linked to your session host servers)

Another interesting setting can be found at the following location
Computer Configuration → Policies → Admin Templates →Windows Components → Remote Desktop Services → RD Licensing
With this setting you can control which RD Session Host servers are issued RDS CALs by the license server. It must be configured in a GPO that is applied to the license server.

Here is the example of how the GPO config shoud look like.
| Policy | Setting | Comment | ||||||
|---|---|---|---|---|---|---|---|---|
| Set the Remote Desktop licensing mode | Enabled | |||||||
|
||||||||
| Policy | Setting | Comment | ||||||
| Use the specified Remote Desktop license servers | Enabled | |||||||
|
||||||||
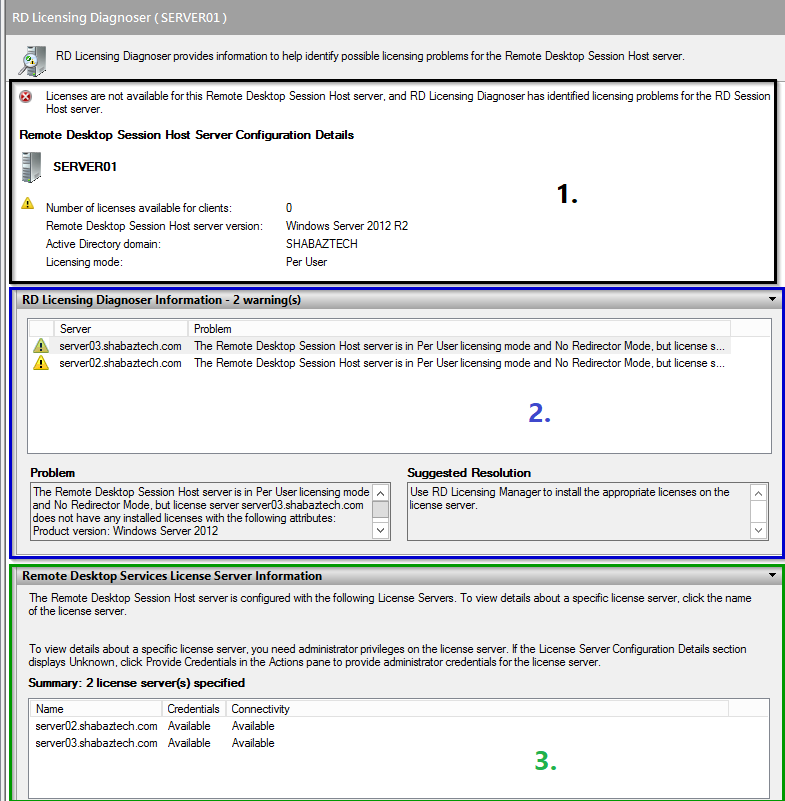
Remote Desktop Licensing Diagnoser
You can use RD Licensing Diagnoser to check licensing configuration details for a session host server. You can also use it to help identify possible licensing problems.
**** Still having issues?
In some cases, a trial of Remote Desktop Services will leave a registry key that requires removal. See the steps below to check if this key is set, and how to remove it.
1) Open “regedit
2) Navigate to the following folder:
a. HKEY_LOCAL_SYSTEM \SYSTEM\CurrentControlSet\Control\Terminal Server\RCM\GracePeriod
3) Inside of the RCM folder you may see a folder titled GracePeriod with a REG_BINARY key. If the GracePeriod folder exists, the REG_BINARY key must be removed.
a. 
Note: Moving forward ensure that you are signed in as an administrator. The following steps will not work unless your current account has admin privilages
4) Right-click the GracePeriod folder and select “Permissions”.
5) Select the “Security” tab and click “Advanced”.
a. 
6) Change the owner to “Administrator”
a. Click “Change”.
b. Type “Administrator” in the large box and click Check names.
c. Click “Ok”
7) Apply Settings.
8) In the “Security” tab, select Administrator(s) and ensure “Full Control” is selected. Then click “Apply”.
a. 
9) Now that we have ownership of the folder, we can delete the REG_BINARY key. Right-click the “L$RTMTIMEBOMB_…” key and select “Delete”. If the permissions were set correctly the key will delete. If you see anotice regarding permissions, please check steps 4-8 again.
10) After the key is removed we can reboot the server and resume normal function. Complete a server reboot at your convenience to finalize the registry key removal.