- September 6, 2019
- Posted by: Syed Shujaat
- Category: Uncategorized
Here are the following steps to install Roles and configuring RDS License server and then ensuring the client is able to fetch licenses from the Terminal License server.
The Remote Desktop Services license server issues client access licenses (CALs) to users and devices when they access the RD Session Host. You can activate the license server by using the Remote Desktop Licensing Manager.
Install the RD Licensing role
- Sign into the server you want to use as the license server using an administrator account.
- In Server Manager, click Roles Summary, and then click Add Roles. Click Next on the first page of the roles wizard.
- Select Remote Desktop Services, and then click Next, and then Next on the Remote Desktop Services page.
- Select Remote Desktop Licensing, and then click Next.
- Configure the domain – select Configure a discovery scope for this license server, click This domain, and then click Next.
- Click Install.
Activate the license server
- Open the Remote Desktop Licensing Manager: click Start > Administrative Tools > Remote Desktop Services > Remote Desktop Licensing Manager.
- Right-click the license server, and then click Activate Server.
- Click Next on the welcome page.
- For the connection method, select Automatic connection (recommended), and then click Next.
- Enter your company information (your name, the company name, your geographic region), and then click Next.
- Optionally enter any other company information (for example, email and company addresses), and then click Next.
- Make sure that Start Install Licenses Wizard now is not selected (we’ll install the licenses in a later step), and then click Next.

Installing RD CALs
This section assumes the RDS license server has been activated. If the license server is not already activated, refer to Section 1.
- Launch the RDS license manager if not already running
- In Windows 2008, click Start > Administrative Tools > Remote Desktop Services > Remote Desktop Licensing Manager.
- In Windows 2012, launch Server Manager and click Tools > Terminal Services > Remote Desktop Licensing Manager.
- Right-click the server name and select Install Licenses.
- Choose the applicable license program and click Next. Refer to Section 3 for information on the license programs.
- Enter the licensing information requested and click Next.
- Enter the product version, license type, and quantity and click Next.
- The status should indicate success. Click Finish.
- Repeat these steps to install additional RD CALs.
Your license server is now ready to start issuing and managing licenses.
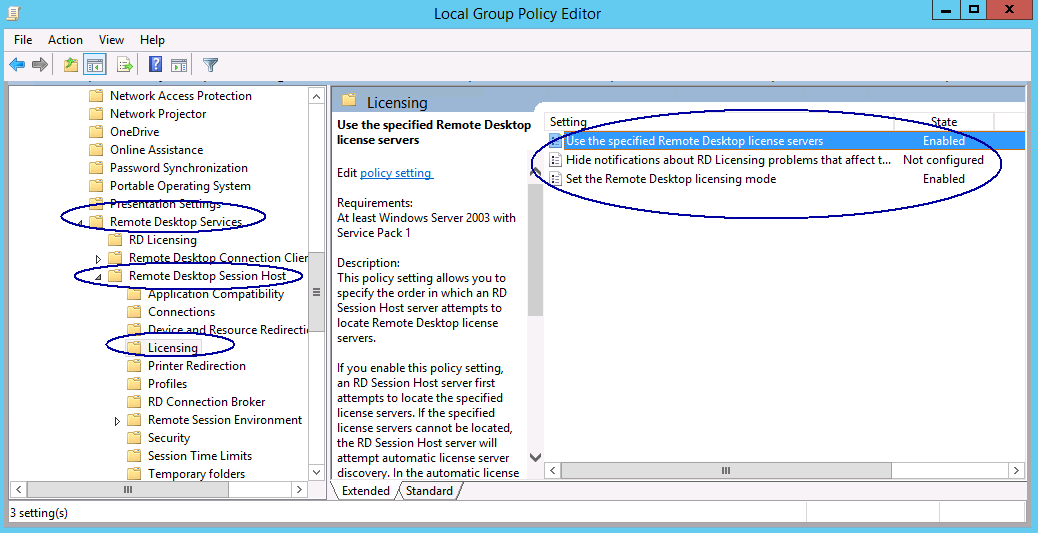
Client End GPO configuration: You can either deploy the following setting from the GPO or go-to machine and do local GPEDIT.msc and make necessary changes on the machine.
Remote Desktop Licensing Configuration
Do the following on your 2012 R2 Remote Desktop Session Hosts. The only way to configure Remote Desktop Licensing is by using group policy (local or domain).
1) For local group policy, run gpedit.msc.
2) Go to Computer Configuration > Administrative Templates > Windows Components > Remote Desktop Services > Remote Desktop Session Host > Licensing.
3) Double-click Use the specified Remote Desktop license servers. Change it to Enabled and enter the names of the XenDesktop Controllers. Click OK.
4) Double-click Set the Remote Desktop licensing mode. Change it to Enabled and select Per User. Click OK.
5) In Server Manager, open the Tools menu, expand Terminal Services and click RD Licensing Diagnoser.
6) The Diagnoser should find the license server and indicate the licensing model. It’s OK if there are no licenses installed on the Remote Desktop License Server.
NOTE: The group policy should point to your RD licensing servers. if you installed it on your Controllers then you would specify them. Otherwise, specify the RD Licensing server names.
- Computer Configuration > Administrative Templates > Windows Components > Remote Desktop Services > Remote Desktop Session Host > Licensing

