- August 31, 2019
- Posted by: Syed Shujaat
- Category: Uncategorized
How to use iSCSI Targets on a Windows Server

Overview
The business-level Synology NAS servers are Microsoft® Windows certified, which means by using the iSCSI Target Service, a Synology NAS seamlessly acts as dedicated storage server to provide iSCSI Target storage for your Hyper-V environment, which will be seen virtually as a local hard drive for as many clients as need be; only they are all stored in a centralized Synology server. Advanced management functions such as Thin Provisioning, iSCSI LUN Backup, MC/S (Multiple Connections per Session) and MPIO (Multipath I/O) are available on Synology NAS to strengthen the usability and stability of a network storage environment. As fully compliant with SPC-3 PR standard, Synology NAS supports Microsoft Windows® Server Failover Clustering as well.
This article will guide you through the process of setting up iSCSI target connection from a Windows Server to your Synology NAS.
iSCSI is an Internet Protocol based storage networking standard for linking data storage facilities. By carrying SCSI commands over IP networks, iSCSI can facilitate data transfers over local area networks (LANs), wide area networks (WANs), or the Internet. Through iSCSI, the space on storage server will be regarded as local disks by client’s operation system. In reality, all data transferred to the disk are actually transferred over network to the storage server.
What is iSCSI Target and LUN?
In SCSI terminology, a LUN (logical unit number) represents an individually addressable (logical) SCSI device that is part of a physical SCSI device (called “Target”). An iSCSI environment emulates the connection to a SCSI hard disk. An iSCSI Target is like a connection interface, and LUNs are essentially numbered disk drives. When an iSCSI Target is connected by an iSCSI initiator (a client), all the LUNs mapped to the iSCSI Target are virtually attached to the client’s operation system. Therefore, Initiators can establish and manage file systems on iSCSI LUNs, as they would a raw SCSI or IDE hard drive.
Contents
1. Before You Start
This article assumes you have performed the following tasks:
- Hardware installation for Synology NAS.
- Create iSCSI LUNs and Targets on your Synology NAS.
After the setting above is finished, you can refer to this article to know how to connect your iSCSI target with Multipath (MPIO).
Refer to Quick Installation Guide for more information about hardware and software installation. You can also see Synology NAS User’s Guide (available at Synology’s Download Center) for a general idea about topics related to this article.
2. Create an iSCSI Target
This section will guide you through the process of setting up an iSCSI target on a Windows Server.
-
- Open iSCSI Initiator in Windows under Control Panel > Administrative tools.

-
- Go to Discovery tab and click on Discover Portal.
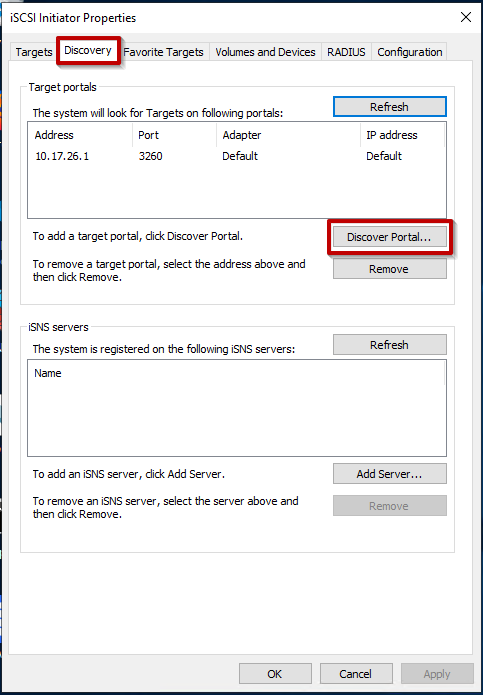
-
- Enter the IP Address or the DNS Name of the Synology NAS, which is hosting the iSCSI Target, then click on OK.

-
- Go to Targets tab.
- Select the desired iSCSI target.
- Click on Connect.

-
- Click on OK if no advanced options are enabled on the iSCSI target on the Synology NAS.

-
- Click on Advanced button if CHAP or any of the Advanced settings are enabled on the iSCSI Target on the Synology NAS.

-
- Enter the name for CHAP.
- Enter the target secret for CHAP.
- Click on OK.
- The iSCSI target is now connected to the Windows PC.

3. Format iSCSI Target for Use on Windows
After an iSCSI Target has been connected on a Windows computer, it will have to be formatted before it can be used.
-
- Open Computer Management under Control Panel > Administrative tools.

-
- Select Disk Management on the left panel. Right click on the iSCSI Target (Disk1) and choose Online.

-
- Right click on the iSCSI Target (Disk1) again and choose Initialize Disk.

-
- A prompt will be displayed to initialize the newly added virtual drive. Please select a partition style most appropriate for the disk to be used then click on OK.

-
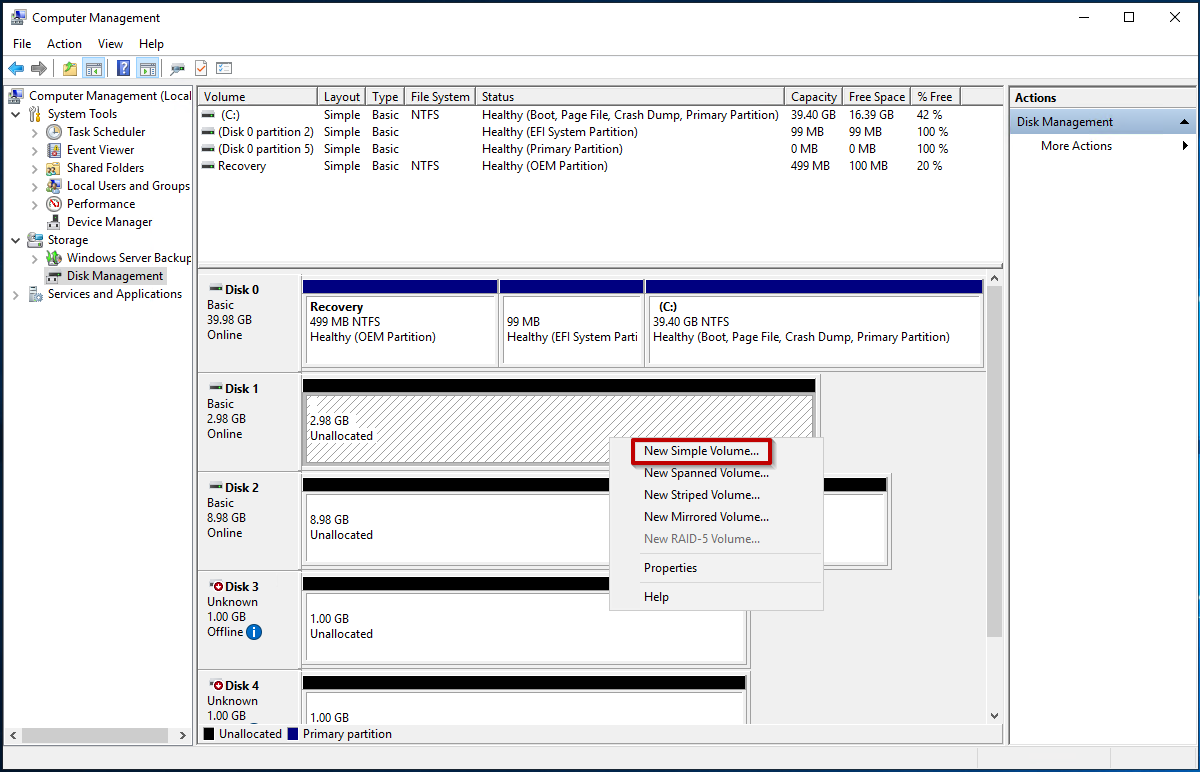
- After the disk has been initialized, right click on the new disk (indicated by the black field), and select New Simple Volume.
-
- Proceed forward with the Simple Volume Wizard.

-
- Specify the volume size to use for the new hard drive, then click on Next.

-
- Assign a drive letter for the new hard drive then click on Next.

-
- Now your Windows Server has an additional drive E: created by Synology iSCSI target.

If you want to use Multipath I/O (MPIO) for the iSCSI targets on your Synology NAS, please do the following first:
- Go to Storage Manager > iSCSI Target.
- Find the desired iSCSI target, and click Edit > Advanced.
- Tick Allow multiple sessions from one or more iSCSI initiators.
- Click OK.