- October 5, 2019
- Posted by: Syed Shujaat
- Category: Uncategorized
The ASA 5506-X has a default configuration out-of-the-box. This default configuration has the following characteristics:
- Internal LAN: 192.168.1.0/24
- Internal LAN can access the Internet.
- The WAN (outside) interface (GE1/1) is configured to receive IP address from DHCP.
- The LAN (inside) interface (GE1/2) has IP address 192.168.1.1
- DHCP is enabled for providing IP address to internal hosts.
In this section we will describe how to change this default configuration to suit your network topology. We assume that you already have network connectivity (or console connectivity) to the device so that you can start configuring with Command Line Interface (CLI).
This is our network topology for the basic configuration.
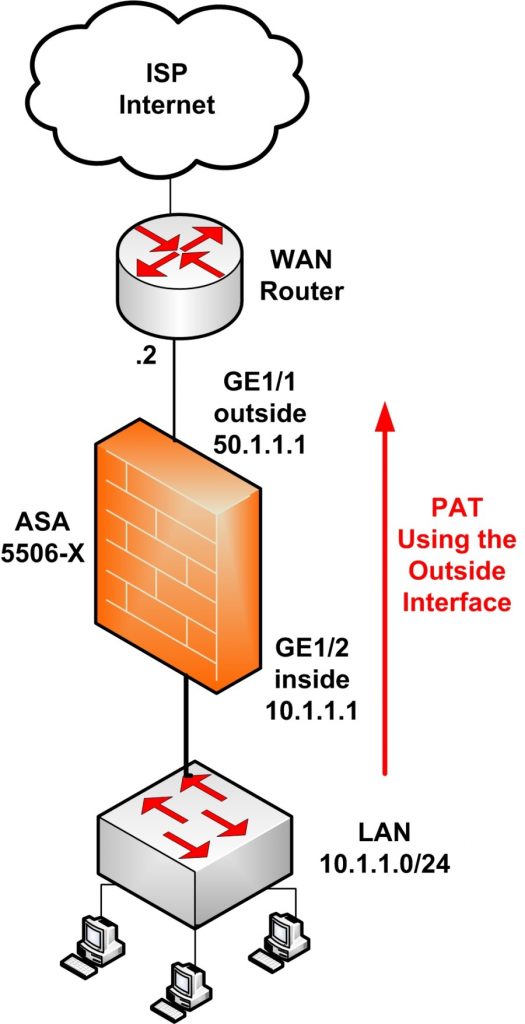
- Internal user LAN: 10.1.1.0/24
- ASA inside IP: 10.1.1.1
- ASA outside IP (static): 50.1.1.1
- NAT: Dynamic overload (PAT) using the outside interface.
Step 1: Configure the Internal LAN interface
description LAN
nameif inside
security-level 100 <- Security level 100 means it’s the most trusted interface
ip address 10.1.1.1 255.255.255.0
no shut
The ASA 5506-X has a default configuration out-of-the-box. This default configuration has the following characteristics:
- Internal LAN: 192.168.1.0/24
- Internal LAN can access the Internet.
- The WAN (outside) interface (GE1/1) is configured to receive IP address from DHCP.
- The LAN (inside) interface (GE1/2) has IP address 192.168.1.1
- DHCP is enabled for providing IP address to internal hosts.
Step 2: Configure the Outside WAN interface
description WAN
nameif outside
security-level 0 <- Security level 0 means it’s the least trusted interface
ip address 50.1.1.1 255.255.255.0 <- Assume we have a static public IP from the ISP
no shut
NOTE:
In case the outside interface will receive IP address dynamically via DHCP use this command:
Step 3: Configure PAT using the outside interface
Step 4: Configure default route towards the ISP (assume default gateway is 50.1.1.2)
OPTIONAL STEPS (But Useful)
Step 5: Assign IP addresses via DHCP to internal hosts
You can configure the ASA to work as DHCP server and assign IP addresses dynamically to internal hosts.
dhcpd dns 208.67.220.220 208.67.222.222 <- ASA will assign DNS servers (these are the opendns by the way)
dhcpd enable inside
Step 6: Enable SSH access for management
crypto key generate rsa modulus 1024
ssh 10.1.1.5 255.255.255.255 inside <- Allow SSH access only from inside host 10.1.1.5
aaa authentication ssh console LOCAL <- Enable local authentication for SSH
username admin password [STRONGPASS] privilege 15
enable password Gh4w7$-s39fg#(!
Step 7: Apply useful ACL on outside
I usually apply the following ACL on the outside interface. It has two purposes: First is to allow ICMP reply packets to come back in (when pinging from inside to outside) and second purpose is to log any denied packets hitting the firewall from outside (for alert and security purposes).
access-list OUTSIDE-IN extended deny ip any any log
access-group OUTSIDE-IN in interface outside
The above concludes the basic configuration of the ASA 5506-X